


In my last post, I looked at how much faster the Double VLOOKUP trick was on sorted data compared with the usual linear VLOOKUP on unsorted data.
Below is the code for the timing routine I use. I stole the guts of it from joeu2004 who made some incredibly insightful comments at this great thread at MrExcel
If you’re going to time formulas, then that thread is required reading, because it makes this important point: we cannot always accurately measure the performance of a formula simply by measuring one instance of it. (But that does depend on the nature of the formula and the situation that we are trying to measure. Sometimes we need to measure one instance of a formula, but increase the size of ranges that it references in order to overcome the effects of overhead.)
I’ve assigned my code to a custom button in the ribbon. You just select the cells you want the formula to time, and click the button. (By the way, my upcoming book not only shows you how to do this, but also gives you routines for every one of the icons shown above and a lot more besides.)
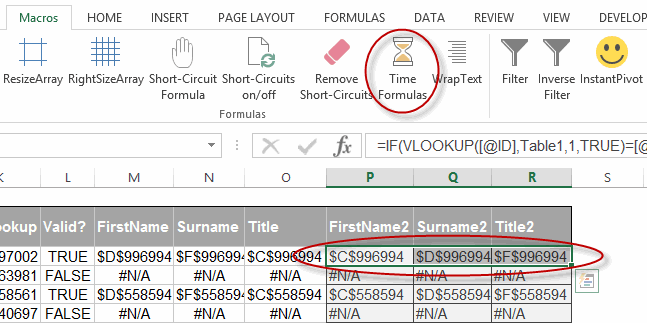
In the above case, I’ve selected a 1 by 3 range selected. If your selection is only one row deep – and there’s more rows with data below – then the app assumes you want to time everything below too, up to the first blank cell it encounters. I may want to rethink that, but it works good for now.
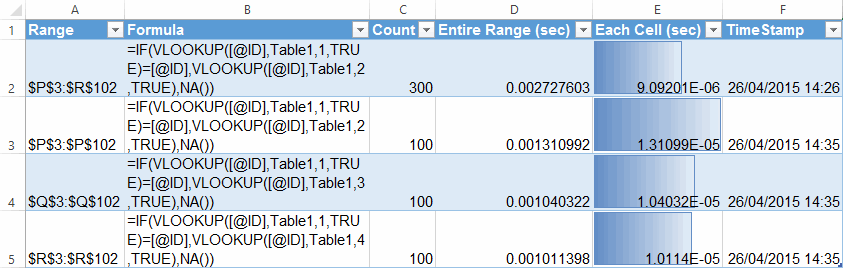
And after I click the magic button, here’s the result:
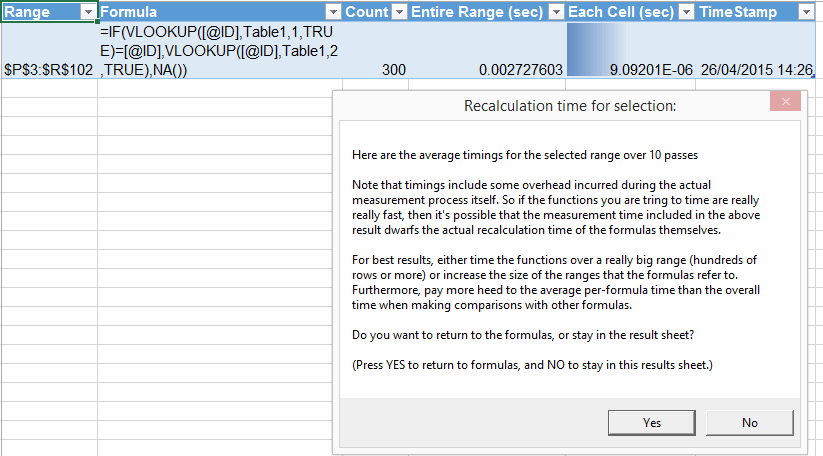
As you can see from the output screenshot above, it puts a new table in a new sheet, populates it with your timings and relevant parameters, and then displays a message with joeu2004’s warning in it. Plus – and I think this is the genius part – it lets you push OK to return back to the sheet where the original formulas are, or push Cancel if you want to stay in the output sheet.
Note the ‘Formula’ column in the output table. For now, it just lists the formula that was in the top-left cell in the user’s selection. I think listing multiple formulas would be overkill. If there’s no formula in the top left cell, it sees if there’s a formula in the cell below. That way you can select headers in a Table, and you’ll still get the formula in the output.
It also can time multiple areas in one pass. So if I select that same range as a non-contiguous selection by holding Ctrl down and clicking each cell as I’ve done here (not that it’s easy to tell the difference visually from the previous screenshot):
…then here’s what I get:
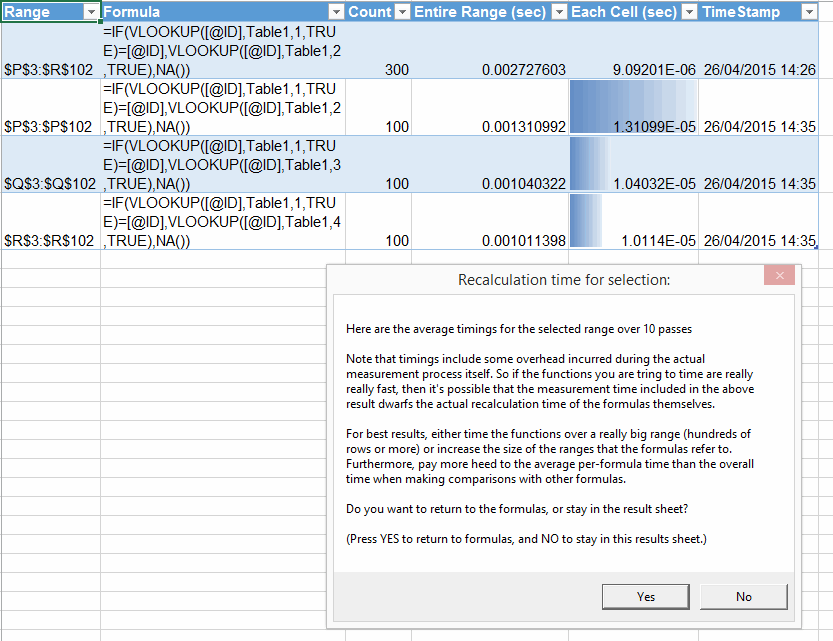
Man, that is sooo much better than having to do each formula separately and then having to manually copy the results from a messagebox into a Table, like I used to do.
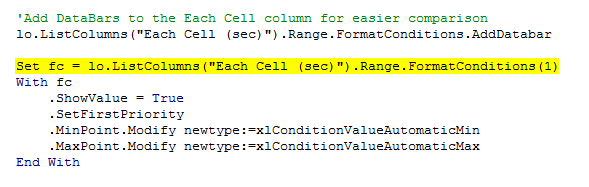
As you can see, I put a a databar on the important column, so you can visually eyeball results instead of conceptually juggling scientific notation in your head. But I’m damned if I can get this to display exactly as I want via VBA. For instance, here’s the databars I want if I add them manually:
Notice that those have nice borders, and sensible setting for the minimum values, meaning that first result also gets a databar. The code that VBA spits out when you add this default databar is pretty ugly:
Selection.FormatConditions(Selection.FormatConditions.Count).ShowValue = True
Selection.FormatConditions(Selection.FormatConditions.Count).SetFirstPriority
With Selection.FormatConditions(1)
.MinPoint.Modify newtype:=xlConditionValueAutomaticMin
.MaxPoint.Modify newtype:=xlConditionValueAutomaticMax
End With
With Selection.FormatConditions(1).BarColor
.Color = 13012579
.TintAndShade = 0
End With
Selection.FormatConditions(1).BarFillType = xlDataBarFillGradient
Selection.FormatConditions(1).Direction = xlContext
Selection.FormatConditions(1).NegativeBarFormat.ColorType = xlDataBarColor
Selection.FormatConditions(1).BarBorder.Type = xlDataBarBorderSolid
Selection.FormatConditions(1).NegativeBarFormat.BorderColorType = _
xlDataBarColor
With Selection.FormatConditions(1).BarBorder.Color
.Color = 13012579
.TintAndShade = 0
End With
Selection.FormatConditions(1).AxisPosition = xlDataBarAxisAutomatic
With Selection.FormatConditions(1).AxisColor
.Color = 0
.TintAndShade = 0
End With
With Selection.FormatConditions(1).NegativeBarFormat.Color
.Color = 255
.TintAndShade = 0
End With
With Selection.FormatConditions(1).NegativeBarFormat.BorderColor
.Color = 255
.TintAndShade = 0
End With
My code is just doing the first line:
lo.ListColumns("Each Cell (sec)").Range.FormatConditions.AddDatabar
…because no matter what I try, doing anything else either causes the code to error out. For instance, even if I just try and set the this errors out:
…and this successfully adds the min setting I want, but errors out when I try to add a listrow:
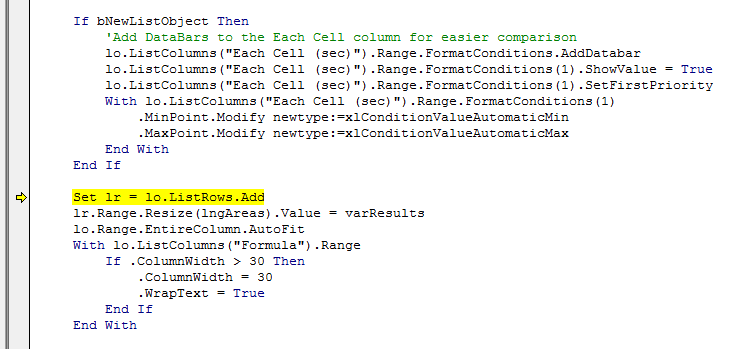
Even worse, when I end the routine, the screen no longer updates no matter what I do. So I have to close out of Excel entirely.
If anyone can tell me where I’m going wrong, I’d be much obliged. Might be another peculiarity of Excel Tables. Meanwhile, I’ll just run with those simple bars.
Here’s my draft code:
Public Declare Function QueryPerformanceFrequency Lib "kernel32" _
(ByRef freq As Currency) As Long
Public Declare Function QueryPerformanceCounter Lib "kernel32" _
(ByRef cnt As Currency) As Long
‘Code adapted from http://www.mrexcel.com/forum/excel-questions/762910-speed-performance-measure-visual-basic-applications-function.html
‘ Description: Determines formusa execution time
‘ Programmer: Jeff Weir
‘ Contact: excelforsuperheroes@gmail.com
‘ Name/Version: Date: Ini: Modification:
‘ TimeFormula 20150426 JSW Added in ability to record times to ListObject
Sub TimeFormula()
Dim sc As Currency
Dim ec As Currency
Dim dt As Double
Dim sMsg As String
Dim sResults As String
Dim i As Long
Dim N As Long
Dim oldCalc As Variant
Dim myRng As Range
Dim lo As ListObject
Dim lr As ListRow
Dim bUnique As Boolean
Dim strFormula As String
Dim myArea As Range
Dim lngArea As Long
Dim ws As Worksheet
Dim wsOriginal As Worksheet
Dim bNewListObject As Boolean
Dim lngAreas As Long
Dim varResults As Variant
Dim varMsg As Variant
Dim fc As FormatCondition
Const passes As Long = 10
With Application
.ScreenUpdating = False
.EnableEvents = False
oldCalc = .Calculation
.Calculation = xlCalculationManual
End With
Set myArea = Selection
lngAreas = myArea.Areas.Count
Set wsOriginal = myArea.Worksheet
ReDim varResults(1 To lngAreas, 1 To 6)
For Each myArea In Selection.Areas
lngArea = lngArea + 1
dt = 0
Set myRng = myArea
If myRng.Rows.Count = 1 Then
If Not IsEmpty(myRng.Cells(1).Offset(1)) Then Set myRng = Range(myRng, myRng.End(xlDown))
End If
N = myRng.Count
If myRng.Cells.Count > 1 Then
‘Get formula from 2nd row in case we’re dealing with multiple cells and happen to be on a header
If myRng.Cells(2).HasFormula Then strFormula = myRng.Cells(1).Formula
If myRng.Cells(2).HasArray Then strFormula = myRng.Cells(1).HasArray
End If
If myRng.Cells(1).HasFormula Then strFormula = myRng.Cells(1).Formula
If myRng.Cells(1).HasArray Then strFormula = myRng.Cells(1).HasArray
With myRng
For i = 1 To passes
sc = myTimer
.Calculate
ec = myTimer
dt = dt + myElapsedTime(ec – sc)
Next
‘Record results for this pass
varResults(lngArea, 1) = myRng.Address
If strFormula <> "" Then varResults(lngArea, 2) = "’" & strFormula
varResults(lngArea, 3) = N
varResults(lngArea, 4) = dt / passes
varResults(lngArea, 5) = dt / N / passes
varResults(lngArea, 6) = Now
End With
Next
bNewListObject = True
For Each ws In ActiveWorkbook.Worksheets
For Each lo In ws.ListObjects
If lo.Name = "appTimeFormulas" Then
bNewListObject = False
ws.Activate
Exit For
End If
Next
Next
If bNewListObject Then
Set ws = ActiveWorkbook.Worksheets.Add
On Error Resume Next
ws.Name = "TimeFormula"
On Error GoTo 0
Range("A1").Value = "Range"
Range("B1").Value = "Formula"
Range("C1").Value = "Count"
Range("D1").Value = "Entire Range (sec)"
Range("E1").Value = "Each Cell (sec)"
Range("F1").Value = "TimeStamp"
Set lo = ws.ListObjects.Add(xlSrcRange, Range("A1").CurrentRegion, , xlYes)
lo.Name = "appTimeFormulas"
‘Add DataBars to the Each Cell column for easier comparison
lo.ListColumns("Each Cell (sec)").Range.FormatConditions.AddDatabar
Else: Set lo = ActiveSheet.ListObjects("appTimeFormulas")
End If
Set lr = lo.ListRows.Add
lr.Range.Resize(lngAreas).Value = varResults
lo.Range.EntireColumn.AutoFit
With lo.ListColumns("Formula").Range
If .ColumnWidth > 30 Then
.ColumnWidth = 30
.WrapText = True
End If
End With
With Application
.EnableEvents = True
.Calculation = oldCalc
.ScreenUpdating = True
End With
sMsg = "Here are the average timings for the selected range over " & passes & " passes "
sMsg = sMsg & vbNewLine & vbNewLine
sMsg = sMsg & "Note that timings include some overhead incurred during the actual measurement process itself. "
sMsg = sMsg & "So if the functions you are tring to time are really really fast, then it’s possible that "
sMsg = sMsg & "the measurement time included in the above result dwarfs the "
sMsg = sMsg & "actual recalculation time of the formulas themselves."
sMsg = sMsg & vbNewLine & vbNewLine
sMsg = sMsg & "For best results, either time the functions over a really big range (hundreds "
sMsg = sMsg & "of rows or more) or increase the size of the ranges that the formulas "
sMsg = sMsg & "refer to. Furthermore, pay more heed to the average per-formula time than the overall time when "
sMsg = sMsg & "making comparisons with other formulas."
sMsg = sMsg & vbNewLine & vbNewLine
sMsg = sMsg & "Do you want to return to the formulas, or stay in the result sheet?"
sMsg = sMsg & vbNewLine & vbNewLine
sMsg = sMsg & "(Press YES to return to formulas, and NO to stay in this results sheet.)"
varMsg = MsgBox(Prompt:=sMsg, Title:="Recalculation time for selection:", Buttons:=vbYesNo)
If varMsg = vbYes Then wsOriginal.Activate
End Sub
Function myTimer() As Currency
‘ defer conversion to seconds until myElapsedTime
QueryPerformanceCounter myTimer
End Function
Function myElapsedTime(dc As Currency) As Double ‘ return seconds
Static df As Double
Dim freq As Currency
If df = 0 Then QueryPerformanceFrequency freq: df = freq
myElapsedTime = dc / df
End Function